AWS EC2 service

In this blog, let us look at one of the AWS services that most AWS users use called EC2. We shall first know what is EC2, why we use EC2 service, what are the types of EC2 instances, and how to use and create your first EC2 instance(if you are learning about EC2 service for the first time).
What is an EC2 instance?
EC2 can be abbreviated as Elastic Cloud Compute which is a compute service that AWS Cloud is providing.
Technically, this service can also be called an EC2 instance. Compute instance in the sense, that AWS provides us with some amount of compute resources such as RAM, CPU, and hard disk.
In normal terms, an EC2 instance is nothing but a virtual server/VM with some specific amount of resources.
It's okay that the EC2 instance provides us with the resources to us. But what are the use cases?
Why do we use the AWS EC2 instance?
There are many use cases for which we use AWS EC2 instances.
To host a website on the server.
To perform any computational tasks.
Some would use it for workspace.
This list extends as there were many use cases.
That means there would be a lot of users for AWS, How do they manage these resources to supply all the users?
How does AWS manage these EC2 instances?
AWS has data centres across the world. They use these data centres to create the resources that their user requested and supplies the resources to the user.
Here comes the concept of Regions in AWS, Let me explain this by taking an example. Assume I have requested an EC2 instance and currently I am living in India, In your account, by default AWS will select a region. If you want to change the region, you can change it through the AWS console which will be located just beside your profile(you can look at the image below).

It is advisable to use the nearest region from your current location. This is mainly helpful in reducing traffic while bringing the web page or information. Let's assume we are in Hyderabad, India and our EC2 instance is created in the US East(N. Virginia), It consumes some time to retrieve the data from this EC2 instance present in Virginia. If we create an instance from the Asia Pacific(Mumbai) region, the time consumed to retrieve the data from this instance is less compared to the previous instance.
Types of EC2 instances
Amazon provides 5 types of EC2 instances which have their own benefits.
General purpose
Compute optimised
Memory optimised
Storage optimised
Accelerated computing instance
Let's assume, we have a big memory application at that time we can use Memory optimised EC2 instance. Similarly, if we take an ML-based application we need more computational servers at that time, we can use Compute optimised EC2 instance. In this fashion, we use these types of instances when we need such type of configurations.
Demo:
Now let us look at how we can create an EC2 instance in our AWS account.
For that, you need to have an AWS account first(if you don't have an account create one and try creating instances).
Creating an instance:
Log into your AWS console and 🔍search bar type EC2, Go for the first result.

You will be navigated to the EC2 dashboard where it will give you the list of resources you are using through this service. You can see my dashboard below.

In the right side top corner, you can see Account attributes. In that, it is selected as a Default VPC, for now, I will continue with this AWS-provided Default VPC. In some other blogs, I will explain what a Virtual Private Cloud(VPC) is and How to create your own VPC.
If you want to look at the list of instances, In the left side Navigation bar Click on Instances which will look like this(If you are a new user or have not created any instance till now your list will look empty). In my account, I have 1 stopped instance.

Now let us create an instance. Click on the Launch Instances button which is located top-right corner. You will be looking like this.

We can create an instance in many ways like through CLI, template, and through console. Now we are following creating an instance through the console. I will discuss the process of creating instances in different ways in some other blogs, if you are a beginner learning about AWS services for the first time this is the way I would suggest.
For every instance, there should be a particular name. Let's keep the name for this server/EC2 instance as demo-0.
Besides the name field, there is something called Add additional tags, basically, these tags are labels for the resources you are allocating. For example, you can add the name of the owner for whom you are giving this EC2 instance. If you want to know more details about tags(link) please go through the documentation of the AWS.
The next thing you need to do after giving a name to your instance is to choose the Operating System(OS) image which means to tell the AWS what OS server you require. AWS provides various operating system images such as Amazon Linux, MacOS, Ubuntu, Windows, Red Hat Linux, SUSE Linux, and Debian. You can choose the image of whatever OS you are comfortable with, in this demo I will choose the Ubuntu image. Then after, you need to choose which Amazon Machine Image(AMI). This is where you can choose an image with a particular type of resource. You can opt for computed-optimized, memory-optimized and general-purpose EC2 instances here through their configurations. If you observe the dropdown below.
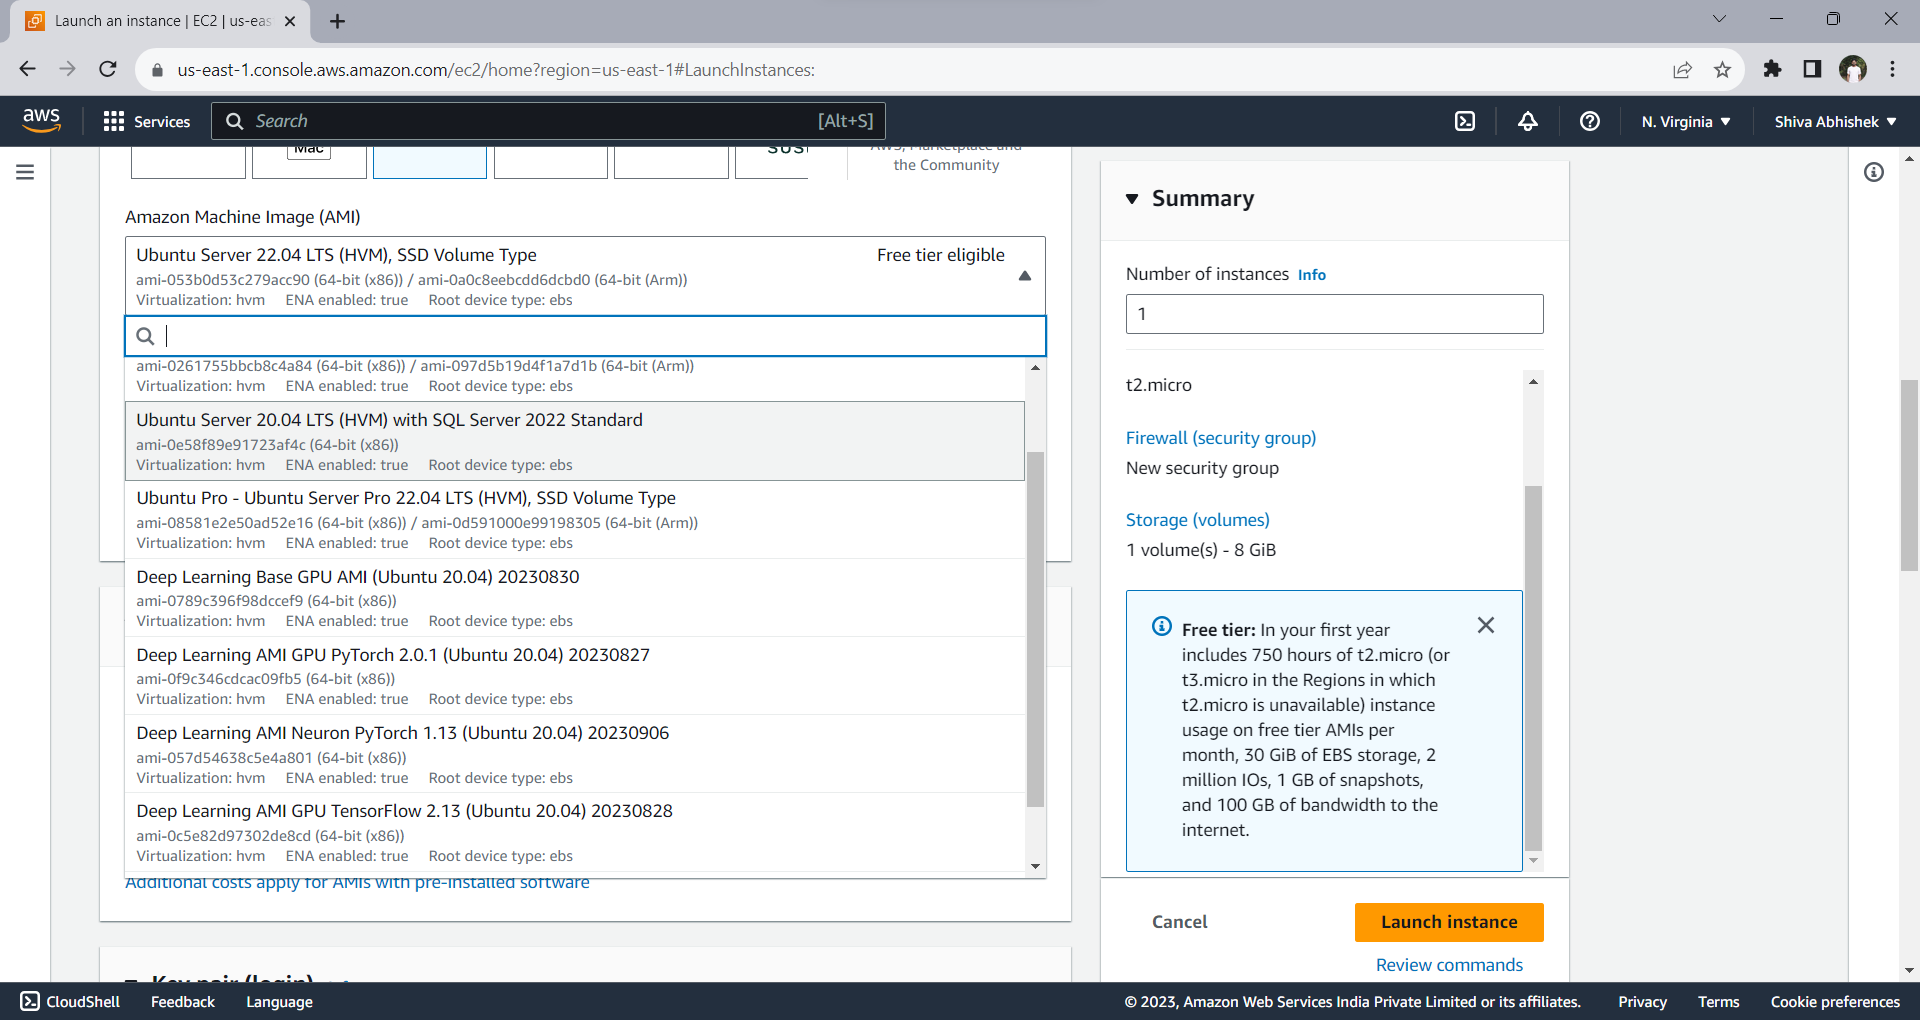
You can look at types of images, Here is the first image in the list: Ubuntu Server 20.04 LTS (HVM) with SQL Server 2022 Standard comes with the SQL server installed in it. Similarly, Deep Learning Base GPU AMI (Ubuntu 20.04) 20230830 which is a compute-optimised EC2 instance used for high computational purposes. For now, I will go with a general-purpose EC2 instance Ubuntu Server 22.04 LTS (HVM), SSD Volume Type. Because we don't perform any tasks in the EC2 instance now this demo is just to create an EC2 instance and connect to it.
Note for the users new to AWS: Amazon charges money for using their resources, If you are new, they will provide you with 12 months free on certain services. There are limited services, you can point out that through a Free tier eligible tag.
The next thing you need to do is select Instance type, here where you can select the size of the storage and the number of CPUs in your EC2 instance**.** For now, I will go with t2.micro which consists of 1 CPU and 1GB memory.
The next thing is the key-value pair, which is used for logging into the instance through SSH. Let's create a new key-value pair for this demo Click on the Create new key pair button which is beside the dropdown which will look like this, give a name to it and click on Create key pair, it will download a .pem file. Store it carefully, it will be used when we connect the instance using SSH.
Then you can leave the next steps for now by giving them the default settings.
You can look at the summary of this instance and then, click on Launch instance it will create an instance

It takes some time to create an instance for you and give us a success message like this.

Now if you list the instance you can look at newly created instances like this.

Connecting to instance:
Since our EC2 instance is up and running, Now let us know how to connect to an EC2 instance.
Connecting to an instance can be done in two ways
Through console
Through SSH
Firstly, let us look at how we can connect to the EC2 instance through the console. This is the easiest way to connect to an instance. If you want to perform small tasks, for instance, it would be helpful.
Go to the AWS console and go to the instances. Select the required EC2 instance you want to connect tick the checkbox beside the name of that instance and click on the Connect button which is present in the top right side buttons. You can look at the image below it is pointing to the Connect button.

Caution: You can only connect to one instance at a time.
Once you click the Connect button, it will take you to a page that shows all the ways to connect to your instance. Stick to the EC2 Instance Connect method to connect to your instance through the AWS console.

Now click on the Connect button below. It takes you to the new tab and takes some time to connect to your instance. Be patient till it connects to your instance.
After connecting, it shows you like this(below image)

That is it, you have connected to your instance through the AWS console.🥳🥳
You can run and perform all the tasks you want.
Now let us connect it through the SSH(Secure Shell).
Open the terminal on your local machine and check whether OpenSSH is installed on your machine or not. Install OpenSSH if not installed. For Windows follow these instructions, for MacOS and Linux it would be easy steps, you can google it and type a couple of commands to install on them.
Currently, I am using a Windows machine. Now I will connect to the EC2 instance through a Windows machine.
If OpenSSH is installed on your machine, you are just one command away from connecting your EC2 instance.
Go to the location where your .pem file is downloaded or copy the path of that .pem file and store it. Also, copy the public IP address of your instance which can be found here.

The command you need to type in your terminal is
ssh -i [location_of.pem] ubuntu@[IP_address]
That's it you will connect to your instance. Take a look at how I have connected to the EC2 instance below.

Type yes when it asks Are you sure you want to continue connecting (yes/no/[fingerprint])?
It is this simple.
To terminate your instance, go to the console, select your instance, choose the Instance state dropdown and there you will see Terminate instance. That's it your EC2 instance will terminate.
Hope you have created your first EC2 instance by following these steps.
Thank you for reading the blog see you in some other blog.😀


