


Hey, I hope you doing well, with this blog, I came up with a CI/CD project in which we are going to build a java based application and create a continuous integration and continuous delivery pipeline to it. That pipeline contains building and testing the project, building the docker image, and finally deploying it on Kubernetes using ArgoCD.
This is the complete end-to-end project and seems like a real-world project which most organizations usually use.
The technologies/tools we are going to use in this project are:
GitHub: To store the code.
Jenkins: To create the CI pipeline.
Maven: To build the application.
Docker: Creating container images.
Kubernetes: To deploy our container.
ArgoCD: For continuous delivery.
Overview
Firstly, let us get the overview of the project like what we are going to do.
Developers develop the code and store it in a central location like GitHub(The code I have taken is an open-source project built by Java Brains(YouTube) Project: IPL Dashboard (playlist). Here in this project, we take that code and create a CI/CD pipeline.
This project is divided into 2 parts Continuous Integration (CI) and Continuous Delivery (CD).
Continuous Integration part:
Initially when we are going to trigger the build for the pipeline,
It builds and tests the spring-boot application using Maven, when it builds successfully it builds the docker image for that application and pusses it to the image registry i.e., docker hub. This is about the CI part.
Continuous Delivery part:
Since we are deploying pour application on Kubernetes, for that we can use one of the Kubernetes controllers "ArgoCD" tool.
Whenever the image tag gets updated, within the CI pipeline, we will write the script that updates the tag present in the Kubernetes deployment manifest file, and ArgoCd takes care of application deployment on Kubernetes.
Now let's get started with the implementation of the project.
Implementation
Continuous Integration part:
Firstly, let's complete all the installation for this part.
I use an AWS EC2 instance, you can use any of the cloud providers or you can also try it on your laptop.
Initially, update your server.
sudo apt-get update
Installing Jenkins.
sudo apt install openjdk-11-jreJenkins is built on top of Java. So, we need to install Java on our server.
Verify it is installed with
java -versioncurl -fsSL https://pkg.jenkins.io/debian/jenkins.io-2023.key | sudo tee \ /usr/share/keyrings/jenkins-keyring.asc > /dev/nullecho deb [signed-by=/usr/share/keyrings/jenkins-keyring.asc] \ https://pkg.jenkins.io/debian binary/ | sudo tee \ /etc/apt/sources.list.d/jenkins.list > /dev/nullsudo apt-get updatesudo apt-get install jenkinsCheck it through the command
systemctl status jenkins, it prompts with
Usually, Jenkins can be accessed on port 8080. On the browser go to
<ip-address>:8080. By default, AWS blocks all the incoming traffic for that reference documentation on how to change inbound rules in the security group.
Setting up Jenkins
Initially, you can able to see this. Go to that path, copy it, and paste it here.
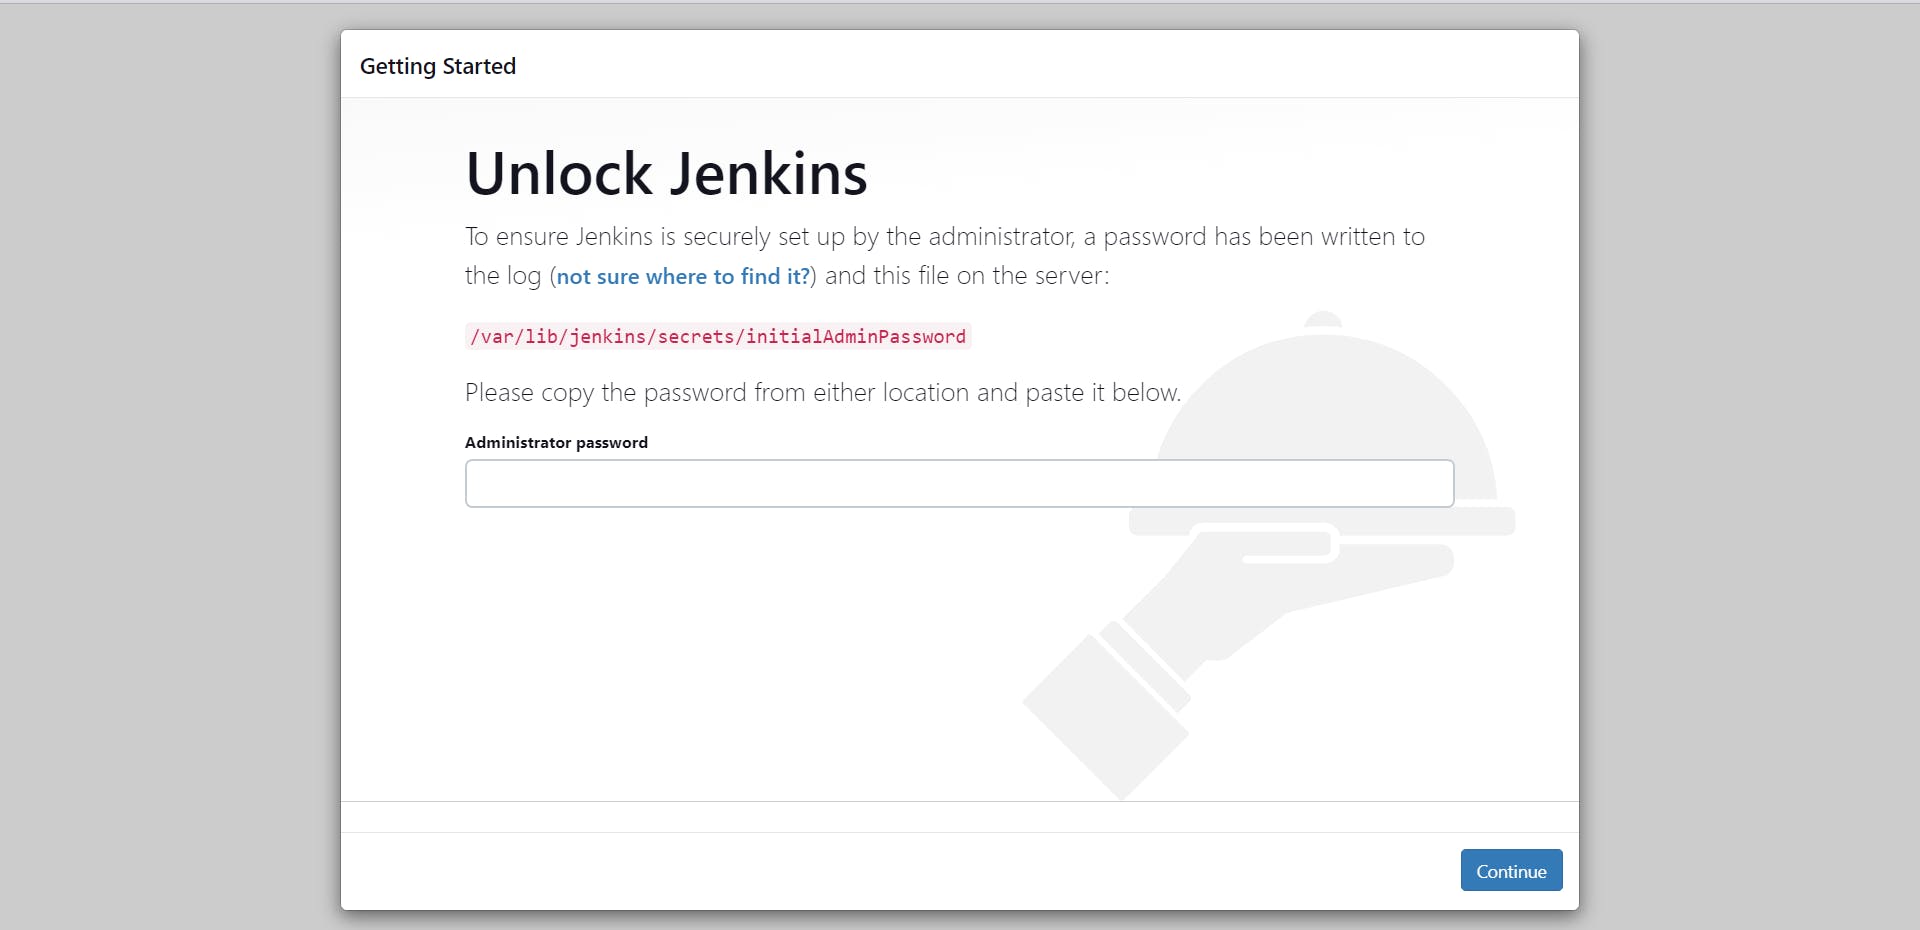

To access this, it asked for root privileges, so we could use
sudo.Next, you will need to install the plug-ins
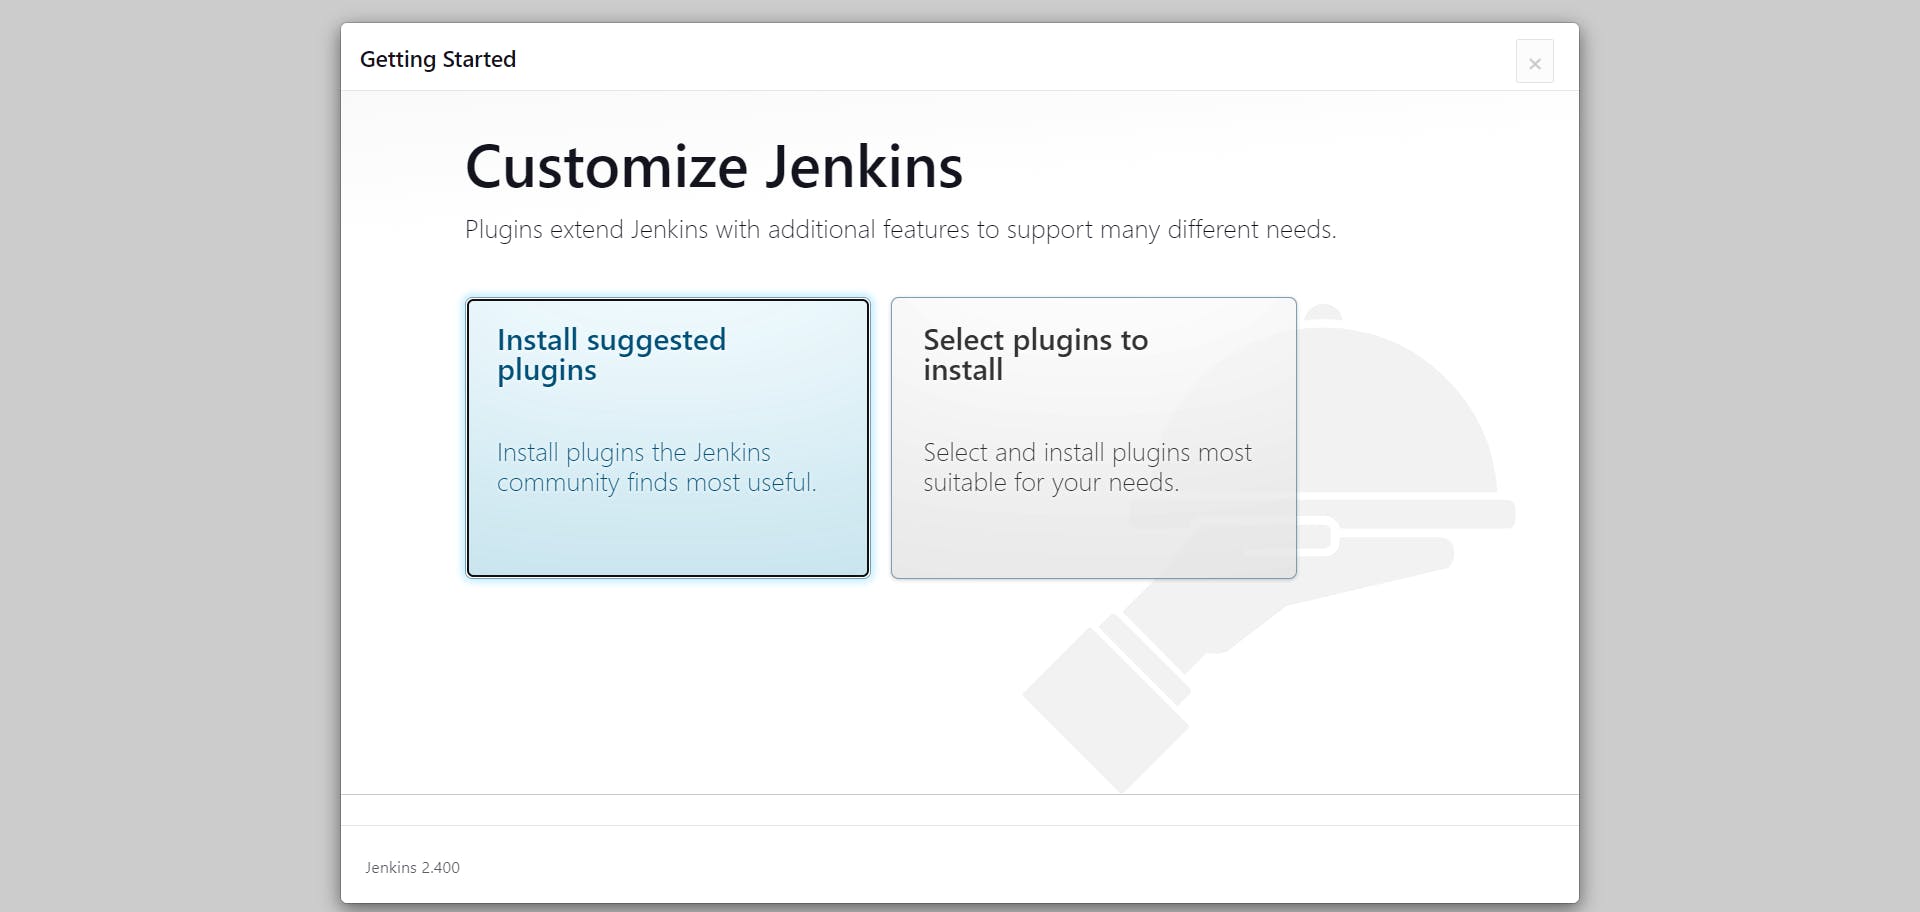
After installing, you need to create your admin user after that set Jenkins URL, after the next step, you will get to access the Jenkins Dashboard.
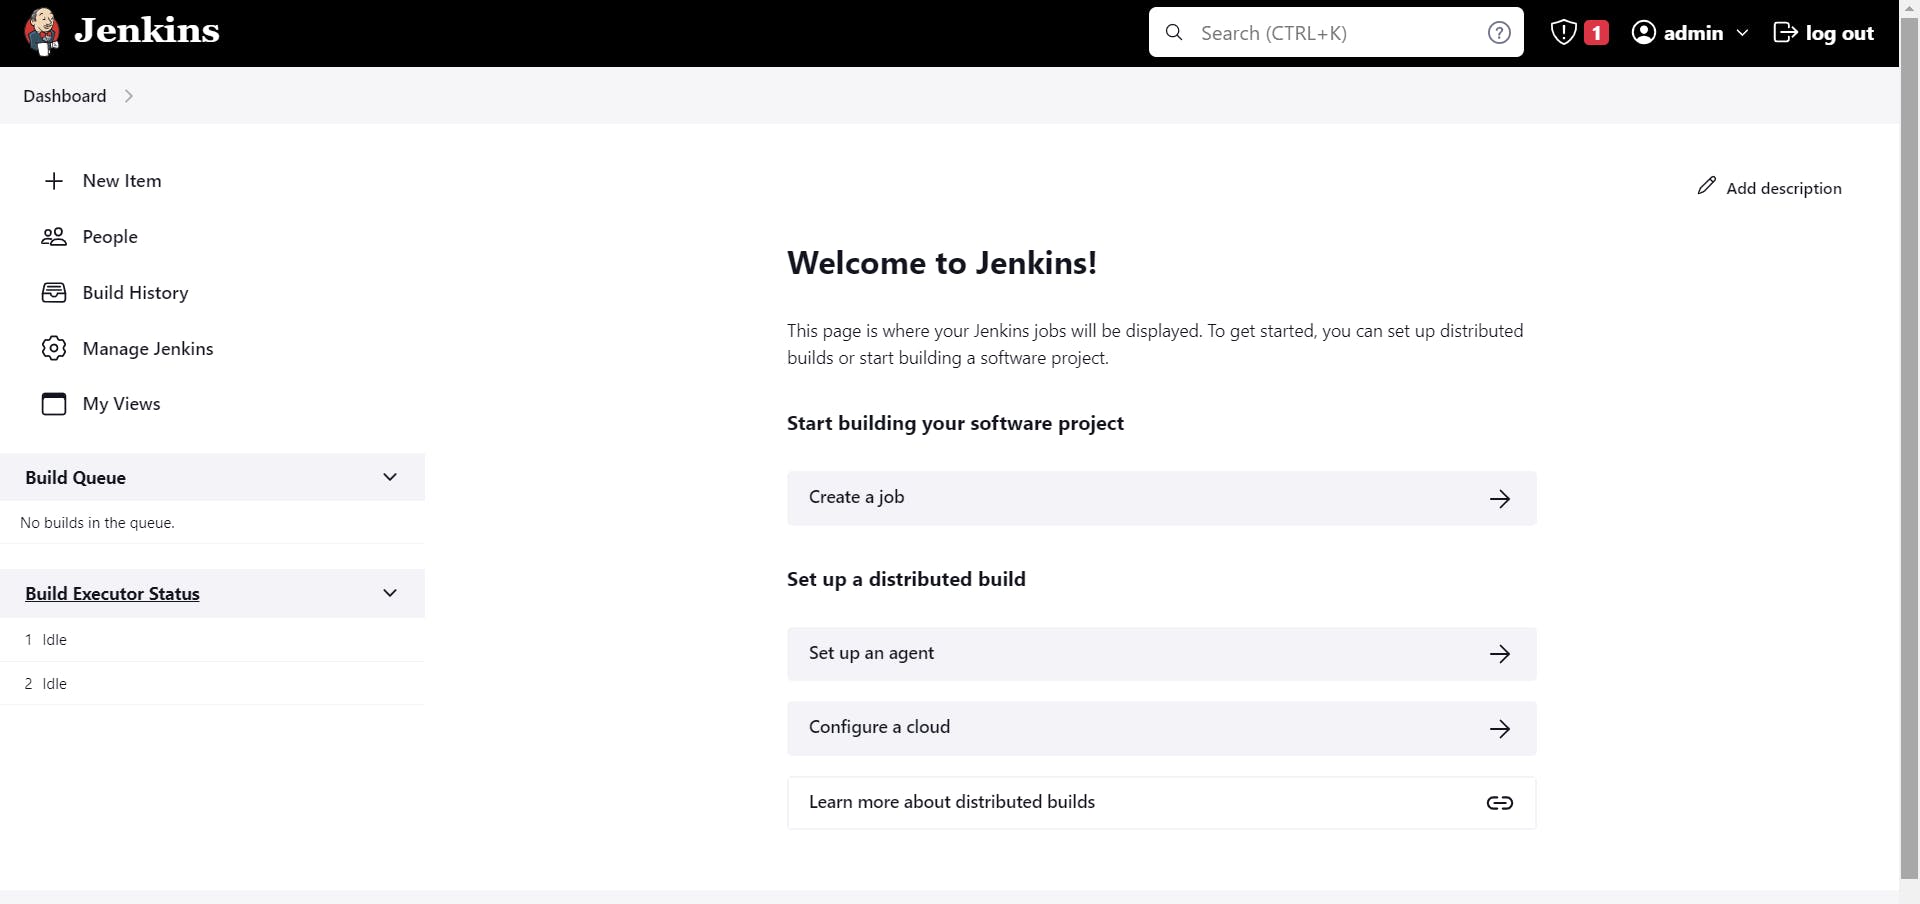
Creating a Job in Jenkins
Firstly, Go to the Jenkins dashboard, and click on Create a job.

After that, name your pipeline and select which type of pipeline you want to create. Here we will select Pipeline. But before this, you have to create a Jenkinsfile at the root of your project.

Navigate down and come to the Pipeline block, there select 'Pipeline script from SCM' which means the pipeline's groovy script is stored in the Source Code Management as Jenkinsfile, Jenkins picks that pipeline script and executes as per that script.

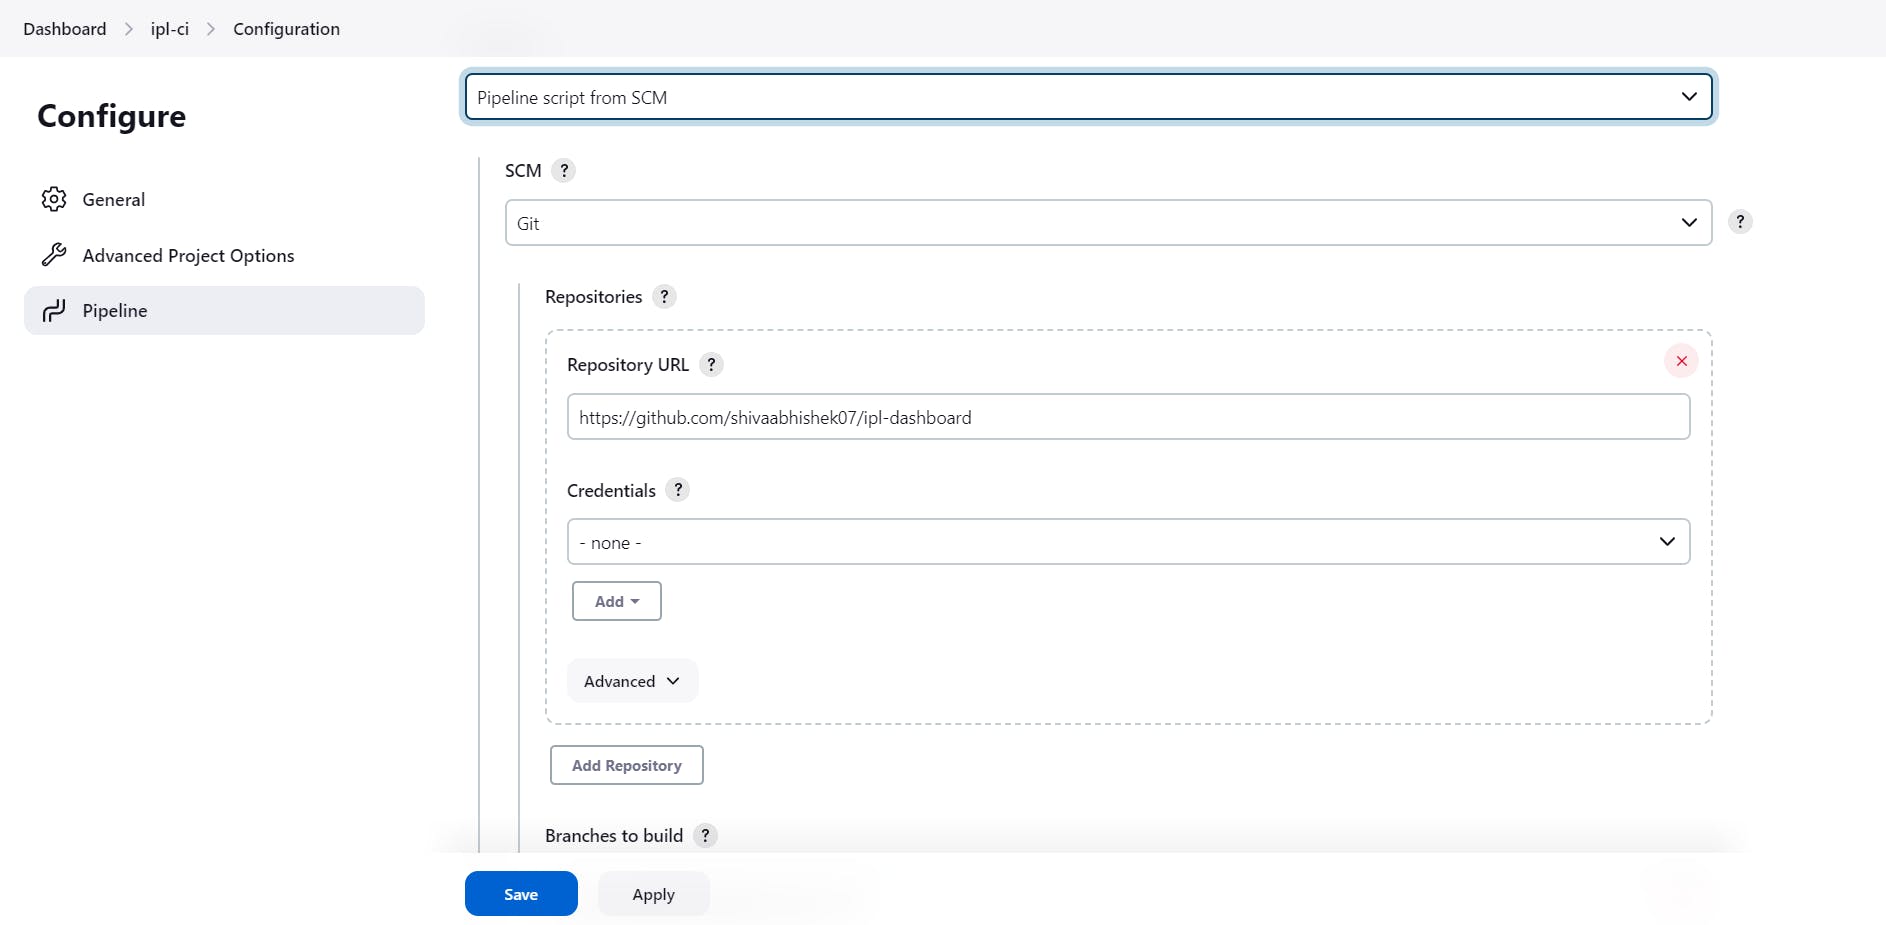

Now just click on Apply and Save. Your pipeline got created in Jenkins. At this particular time, you just need to click on Build now, but before that, you have to set up the remaining things like setting up SonarQube and the other things in our project.
Writing Jenkinsfile
Create a file named Jenkinsfile at the root of your project. In this file, we will write our script in Groovy script since we are creating a declarative pipeline. Here we will write our entire process like code.
For more information, you can refer to the official documentation(link).Use the agent as a docker because the docker images are lightweight and they can spin up anytime fastly.
Write all the stages you want to require in the pipeline.
You can access Jenkinsfile from here.
Installing Docker in the server because we are using Docker as a slave
You can refer here for the installation of docker on Ubuntu.
Now Install the Docker pipeline in the Jenkins plugins. For that Refer here.Setting up credentials
In our Jenkinsfile, we need to push our newly built image to the registry for that we have to provide the credentials of the registry. Here I'll use DockerHub as my registry.
Go to Dashboard -> Manage Jenkins -> Credentials ->System -> Click on (global) after that you will observe the Add Credentials at the top-right side. There you can add your credentials.
Similarly, We need to update the deployment file which is in GitHub for that also we need credentials.
Click on the build now, and make sure everything is good!
Continuous delivery part:
In this part, we have to ensure that our application is correctly deployed on Kubernetes with all the given configurations or not. For that to always monitor our configurations and handle the same state of the pods and deployment, we use one controller of Kubernetes which is ArgoCD.
ArgoCD is the open-source GitOps continuous delivery tool.
Here we use, Minikube, kubectl and ArgoCD.
Install Minikube and Kubectl from here. Start minikube cluster with minikube start command.
Now we will install the kubernetes controller through operators. Go to https://operatorhub.io/ and search for ArgoCD. Click on the first icon of the ArgoCd and then click on Install, you may look at some steps like this
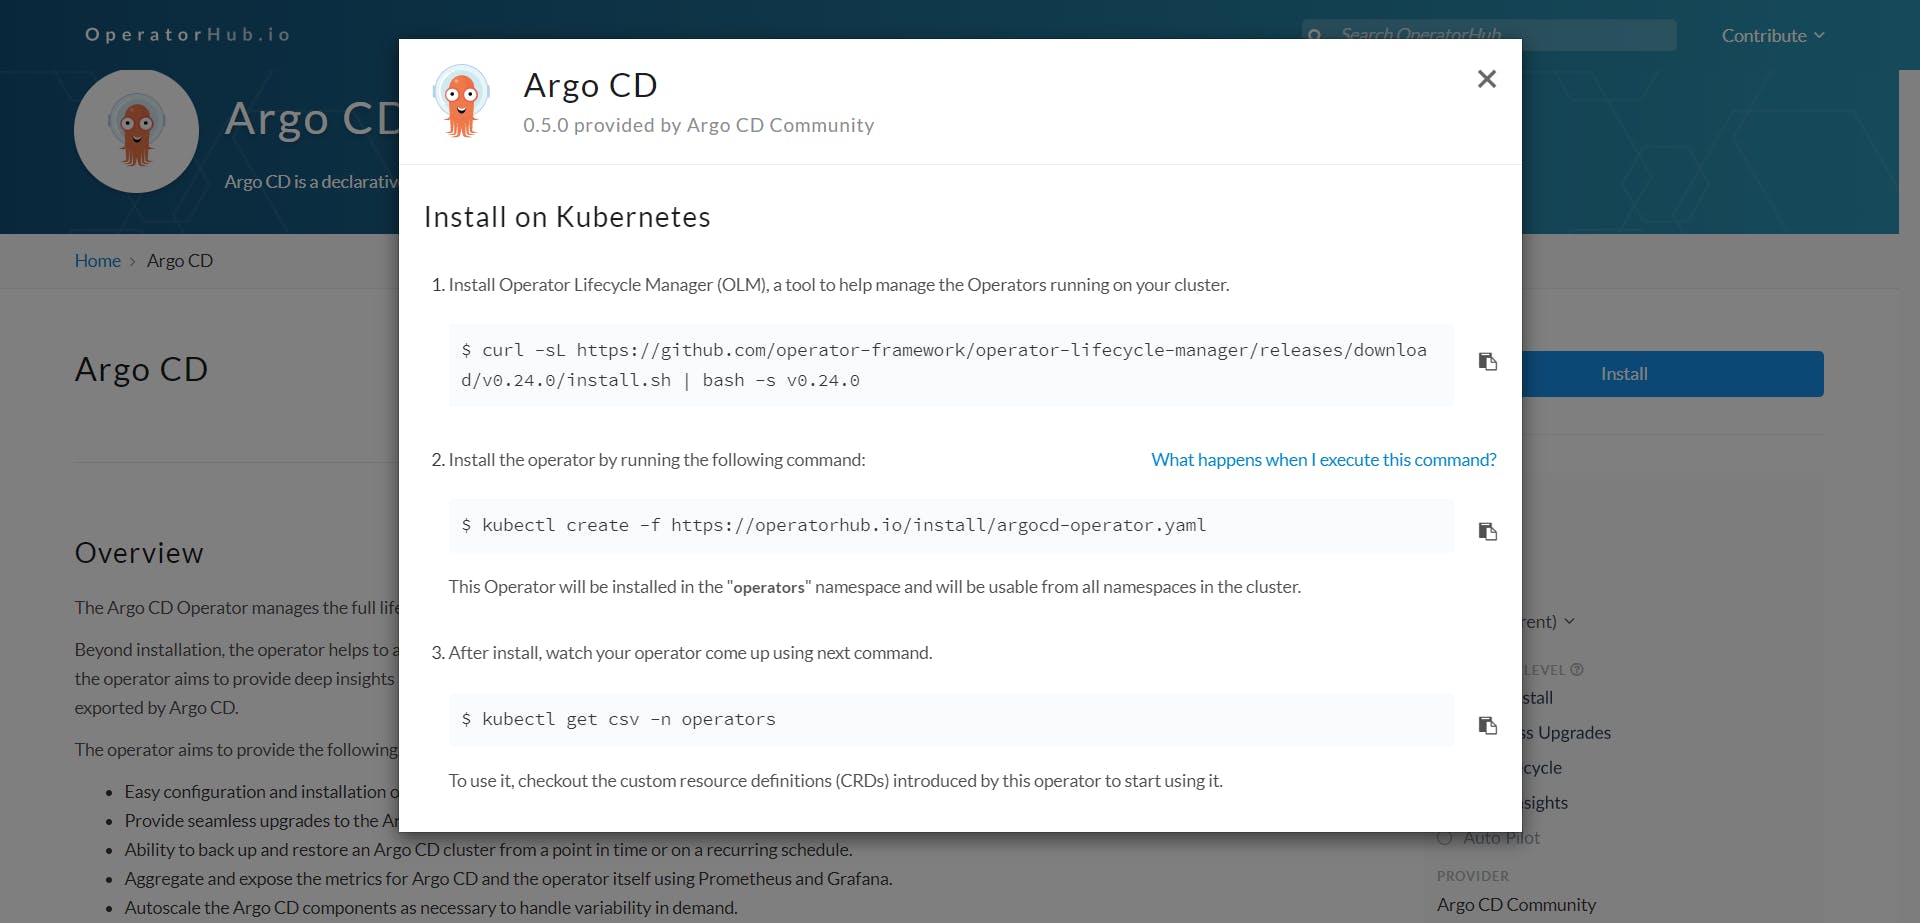
Follow all those steps as maintained in that as is, and you will install the k8s controller. This process may take a few minutes, be patient. Wait till you get Succeeded in the last step like this, After this follow the below steps.

Now, you have to create an ArgoCD controller. Create a yaml file for that and copy the below configuration.
apiVersion: argoproj.io/v1alpha1
kind: ArgoCD
metadata:
  name: example-argocd
  labels:
    example: basic
spec: {}
After creating this, let's assume it is created with argocd.yaml. Now apply it with kubectl apply -f argocd.yaml . If successful it pops up a message like it is created.
After this when you try kubectl get pods it looks like, for that you have to wait for a few minutes.

Now, if you want to access it through the UI, then you have to expose one of the services, the Ui's service is example-argocd-server.

Edit its type from ClusterIP to NodePost by kubectl edit svc example-argocd-server

To access it from the browser, we have to have a link right?
For that minikube can port forward and supply us with the link with the command
minikube service exaple-argocd-server
We get the link to access the ArgoCd from our browser and the output of the command looks like

After going to the first link, we can look into ArgoCD's login page

Here, Username: admin and Password are stored in the kubernetes secrets
kubectl get secret
kubectl edit secret example-argocd-cluster
echo ... | base64 -d

Enter the output by this command in the password section(except that % symbol), you will get logged in to ArgoCD.
Now create a deployment.yaml in a separate repository or the same repo. I have created it in the same repository under the Kubernetes folder.
apiVersion: apps/v1
kind: Deployment
metadata:
  name: ipld-deployment
  labels:
    app: ipl
spec:
  replicas: 2
  selector:
    matchLabels:
      app: ipl
  template:
    metadata:
      labels:
        app: ipl
    spec:
      containers:
      - name: ipl-db
        image: shiva71/ipl-dashboard:latest
        ports:
        - containerPort: 8080
The final, step Creating the application in the ArgoCD.
Go to ArgoCD -> Create Application, there fill in the details required like
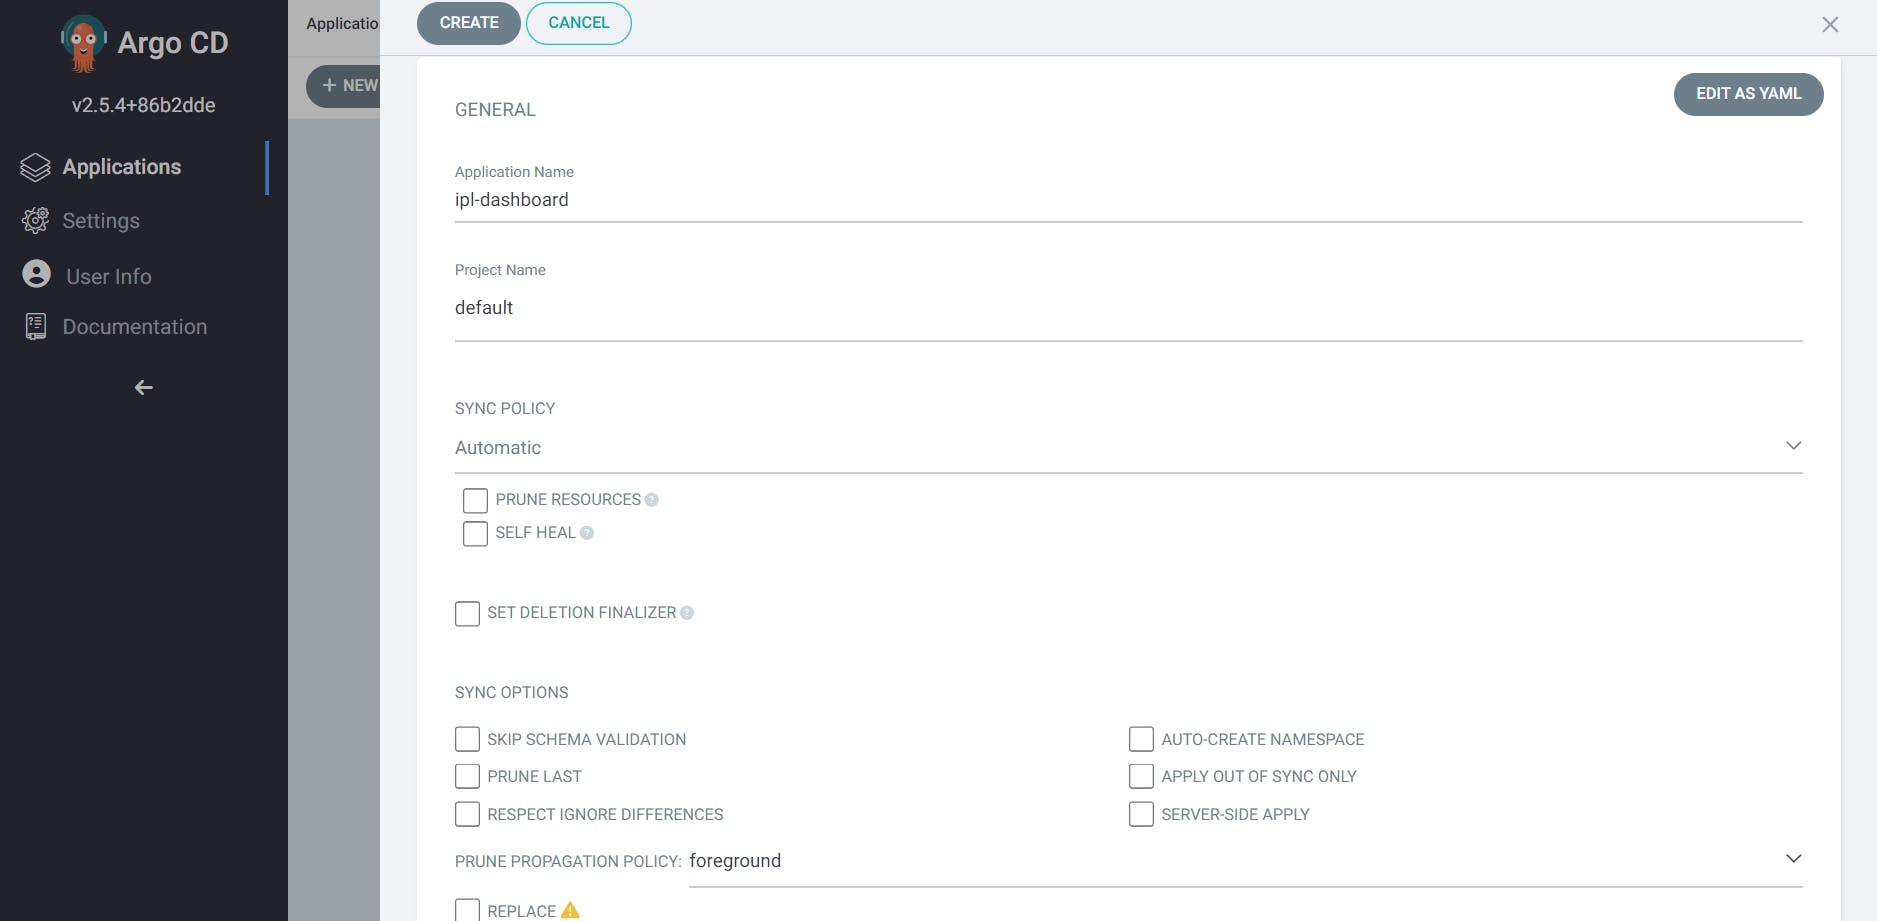

After clicking on Create, your application gets deployed on the k8s and can look like

Now, your application is up and running inside Kubernetes. To access that application from the internet, we have to use the services. For that create the service.yaml file, ArgoCd will look after the updation of the service to the application.
To get the link to that application follow the same procedure as getting the URL of ArgoCD's UI.

Finally, our application is up and running.

Thank you for reading this patiently, I hope you have tried it and got the result as same as mine.